


6 Steps Milky Way Tutorial - Shutter Pros
The feeling when your eyes finally adjust to the dark and you get your first glimpse of the Milky Way spanning across the night sky with your own eyes is magical. If it is your first time under a really dark sky you can’t even comprehend the number of stars you are able to see. Then you take a picture with your camera and what you could see with your eyes pales in comparison to the image saved to your SD card. Our eyes adjust naturally to the dark, but in order to capture a high-quality you need to have the appropriate knowledge, plenty of practice, and some patience.
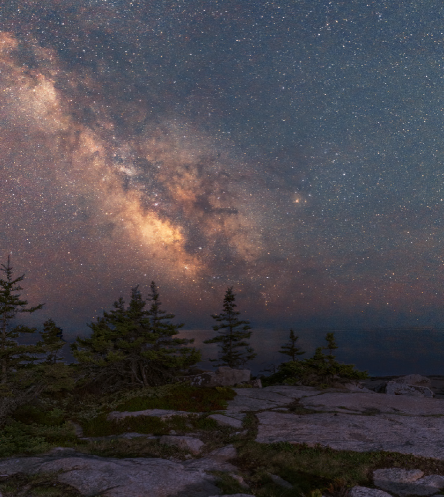
Photo right
Schoodic Peninsula, ME, USA.
Sony A7iii, 20mm, f / 2.8, ISO 3200, 15 sec.
Step 1 WHEN CAN I PHOTOGRAPH THE MILKY WAY?
The Milky Way is always visible in the night sky, but the most photogenic section, the Milky Way core, is only above the horizon in the Northern Hemisphere from February to October. The time of night the core is visible changes throughout the season. In February it is visible from 4 am to 5 am, in the middle of the season in July it is visible from 11 pm to 3 am, and in October it is visible from 7:30 pm to 8:30 pm. You also want to try to photograph the Milky Way as close to a new Moon as possible. The Moon will wash out the stars, but you can also use the Moon to your advantage and use the setting or rising moonlight to light up your foreground.
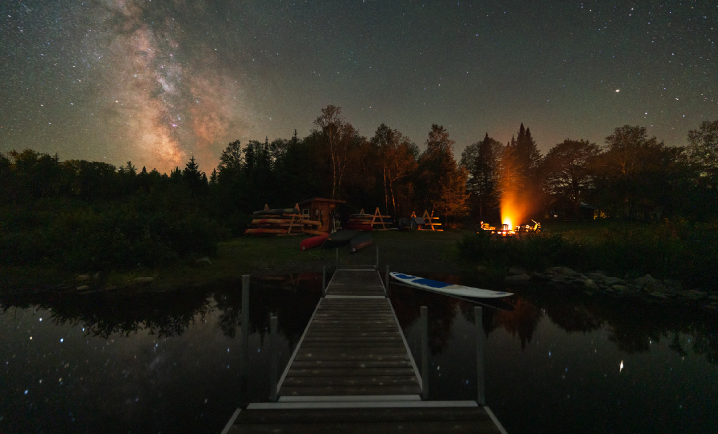
Medawisla Lodge at the new Dark Sky Park in Greenville, ME, USA.
Sony A7Riii, 14mm, f / 2.0, ISO 3200, 30 sec.
The first step in capturing the night sky is knowing where to point your camera. In the northern hemisphere, the Milky Way is in the Southeast in February and is at about a 45-degree angle. In July the Milky Way is just about due south and starts at a slight angle but ends the night fairly vertical. At the end of the season in October, the Milky Way is in the Southwest and is vertical, and starts angling to the right as the night goes on. When you are at your location and you are lining up your composition it helps to know exactly where the Milky Way is. There are a few ways to go about this. The easiest is to use an app on your phone. There are various apps, but PhotoPills has an excellent augmented reality function that shows you where the Milky Way is in the sky (plus it has a lot of helpful functions that assist your planning for Milky Way photography). The other way is to use your camera to locate the Milky Way. Assuming you are using a digital camera you can take a test shot, review your results and adjust your composition to get the Milky Way where you want it. If you are using a Sony Mirrorless there is an option to turn on “Bright Monitoring” which turns up the gain on the sensor so you can see a live preview of the Milky Way and adjust your composition in real-time.
Step 2 FINDING A DARK SKY
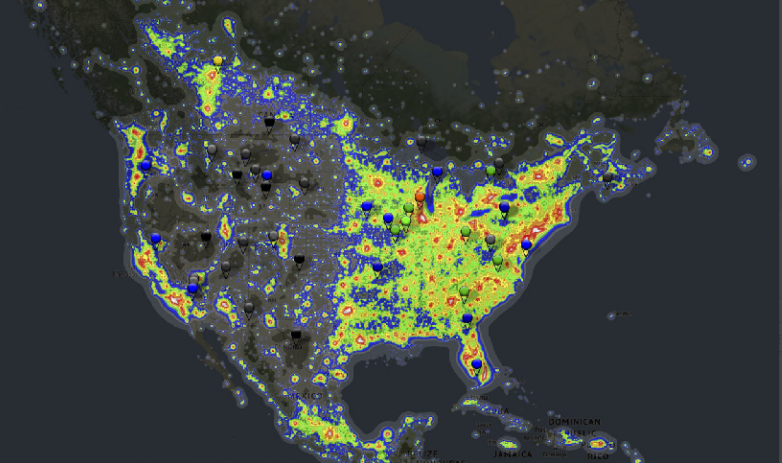
Map from darksitefinder.com
Not all skies are created equal. While moonlight can ruin a perfectly clear night, the more common enemy to capturing the stars is light pollution. We have probably all seen the blue marble earth image where you see all the lights illuminating the earth. While this is a beautiful image, these lights are a detriment to your Milky Way images. There are many apps and resources for finding a dark sky. A few are darksitefinder.com and lightpollutionmap.info. The measurement of light pollution is on the Bortle scale. It goes from 1 (Excellent dark sky) to 9 (Inner-city sky). Each location is different but you want to try to find at least a Bortle 4 or lower to get good results. While these maps are a good start they don’t show you information about any local light sources. If your location is a Bortle 2 but there is a streetlight right next to your foreground it can ruin your image. A best practice is to visit your location during the dark before you plan to photograph the Milky Way so you can find out if there is any local light pollution to avoid.
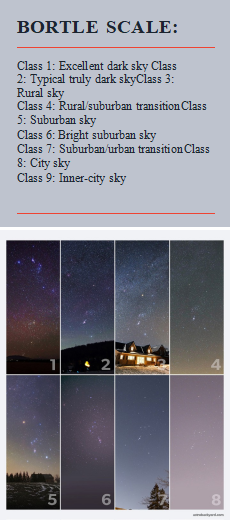
Example of Bortle lights from astrobackyard.com.
Step 3 WHAT GEAR SHOULD I USE?
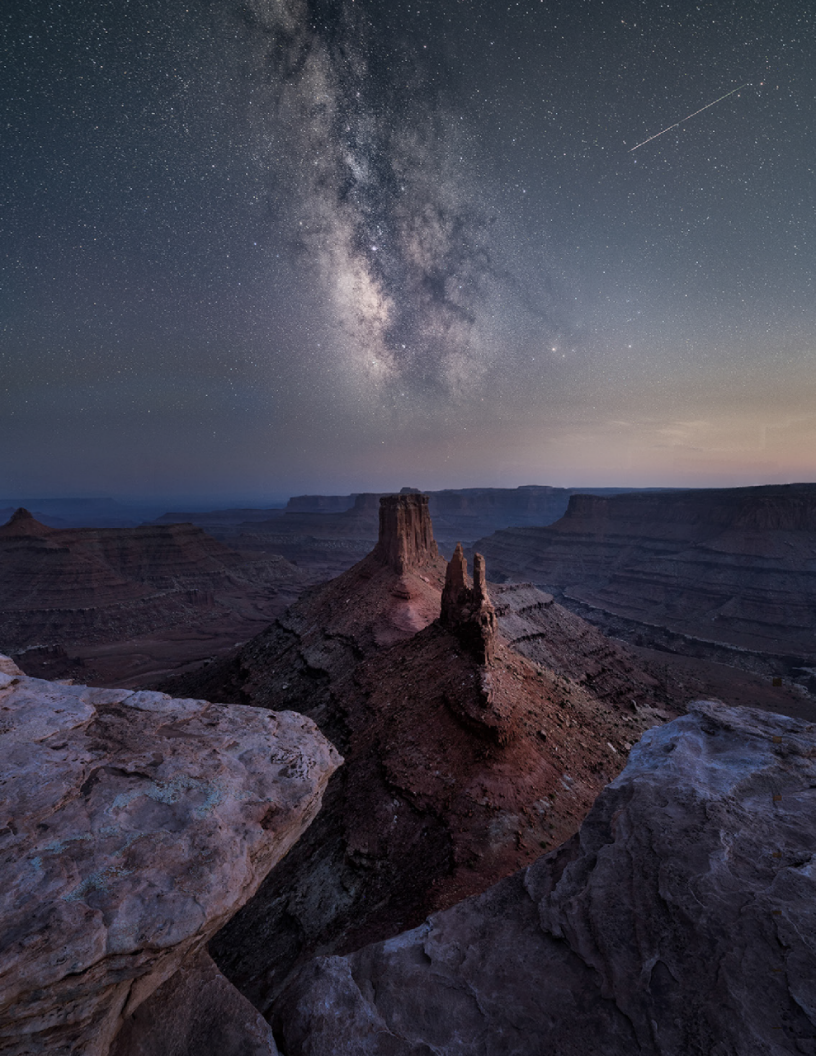
Bureau of Land Management
Land, Moab, UT, USA. Blue hour blend.
Foreground: Sony A7iii, 12mm, f / 11, ISO 250, 25 sec.
Sky: A7iii, 12mm, f / 2.8, ISO 3200, 20 sec, 20 images stacked.
While any modern camera (and even some cell phones) can capture the Milky Way. To get the best quality images there are a few things you want. A large sensor and a lens with a wide f / stop. The goal is to capture as much light as you can to get the cleanest image with the most color data. The larger the sensor the more light you gather and the lower your f / stop the more light you project onto the sensor.
RECOMMENDATIONS:
• At least a micro 4/3 camera, but APS-C and Full Frame are better.
• A wide-angle lens (between 14-35mm) that opens up to at least f / 2.8.
• A good and stable tripod.
• A way to take an image without causing any vibrations (timer, shutter release, or phone app).
• A star tracker like the Move Shoot Move
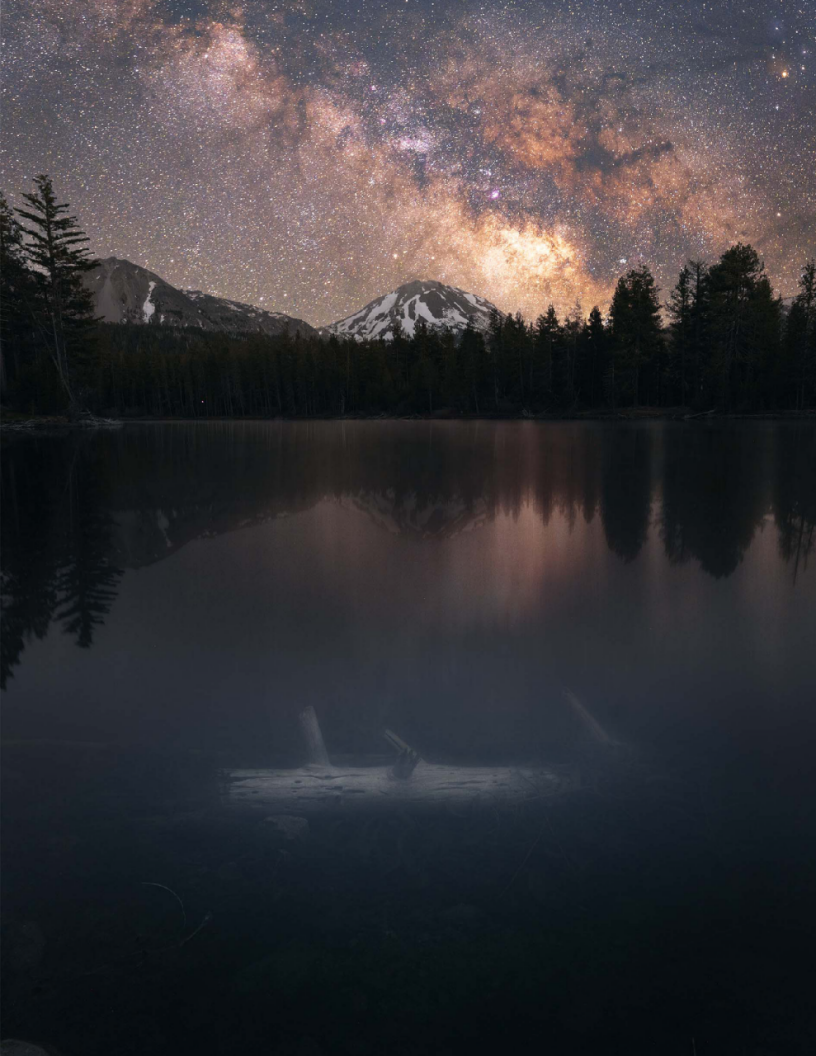
Lassen Volcanic National Park, CA, USA. Blue hour blend.
Foreground: Sony A7Riii, 20mm, f / 8, ISO 100, 13 sec.
Sky: A7Riii, 14mm, f / 3.2, ISO 640, 190 sec.
- WHY A STAR TRACKER?
Tracking is steps above a single image, your night sky will give you an even cleaner and more colorful Milky Way. Previously, we talked about how our goal was to capture the most amount of light on your camera’s sensor as possible. Having a full-frame sensor and a lens with a wide aperture is the best we can do with our gear for single images. But we are still limited by how long we can have our shutter open before we get star trails. A star tracker fixes this issue as it rotates your camera at the same speed as the earth allowing you to take images that are measured in minutes instead of seconds. This allows you to lower your ISO from 3200 down to 640 or less. The major drawback to this technique is that the earth keeps rotating and gets blurry. So you need to take at least two images, one for the Milky Way with the tracker, and one for the foreground with the tracker turned off, and then combine them in Photoshop. This tutorial doesn’t cover the blending of the images but during our workshop in Utah we will have multiple trackers provided by Move Shoot Move and we will go over the setup, use, and postproduction editing and blending.
Step 4 WHAT SETTINGS?
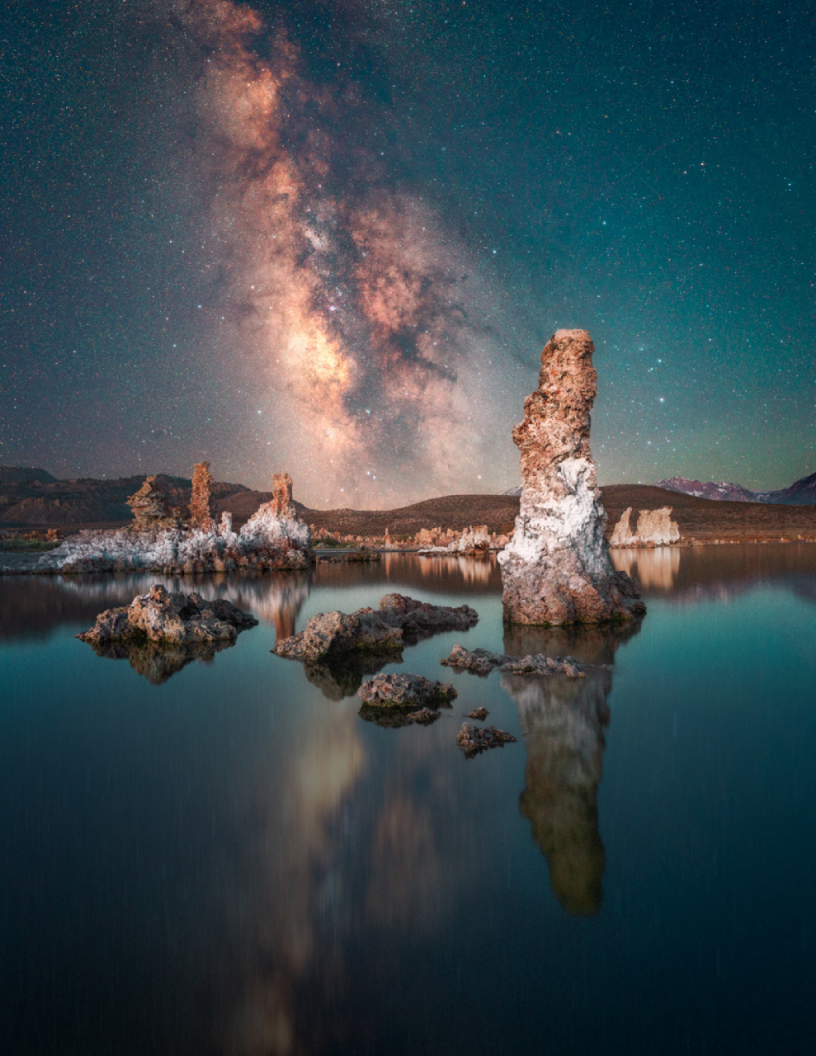
Mono Lake Tufa State Natural Reserve, CA, USA. Blue hour blend.
Foreground: A7Riii, 17mm, f / 3.5, ISO 800, 25 sec. Sky: A7Riii, 17mm, f / 3.5, ISO 800, 112 sec.
Now that you know how to find the Milky Way in the sky, at the right time of the year, and under a dark sky, you need to know what settings to use.
- FOCAL LENGTH
If you want to include a foreground and not just capture the stars the wider the focal length the better. 14mm-24mm is ideal.
- F STOP
f / 1.8-2.8 is ideal. If f / 4 is as wide as your lens is able to open up you can work with it.
- ISO
Finding a good balance between noise and the increased amount of light captured is dependent on your specific camera. On a star tracker, ISO 800 is usually a good place to start. For a single image ISO 3200.
- SHUTTER SPEED
This depends on your focal length but you want it as long as possible without getting star trails. On the tracker, you will usually be between 2 and 5 minutes. For a single image, you will be between 10 and 30 seconds (PhotoPills will calculate the NFP and 500 rule for your camera and lens combination to get the best shutter speed).
- WHY A WIDE-ANGLE LENS?
There are two reasons to choose a wide angle lens. First, it is easier to include a foreground as well as the milky Way. Second, while it is possible to take a 30-minute exposure of a stationary object like a building and still have it come out perfectly sharp, photographing the stars doesn't work that way. The earth is rotating, so if your shutter speed is too long your stars will change from sharp points in the sky into trails. In general, the wider your focal length the longer your shutter speed can be, the longer your shutter speed the more light your sensor can capture resulting in an image with less noise and more color.
Step 5 SET UP THE MOVE SHOOT MOVE STAR TRACKER
Now that you have a good understanding of what settings to use you will need to set up your camera on the star tracker.
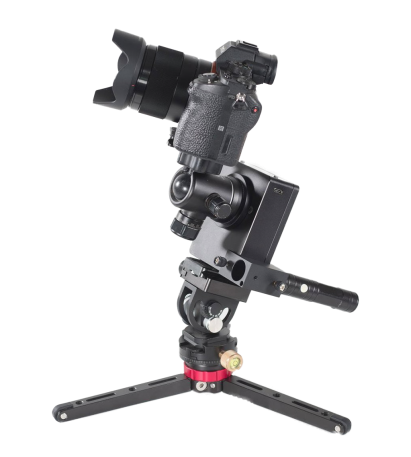
- Set up your tripod on sturdy ground. Level the tripod as best you can.
- Mount a ballhead on the tripod and make sure it's level.
- Mount a second ball head onto your Move Shoot Move (MSM) Star Tracker.
- Mount the MSM to the ballhead on your tripod.
- Turn on the tracker. The MSM tracker has the letters ‘’N’’ and ‘’S’’ on the top side for Northern Hemisphere and Southern Hemisphere. Depending on where you are located you will have to adjust which one you will choose.
- Mount your camera to the ballhead on the MSM. Tighten down all the contact points. Any loose knobs or connections will ruin your photographs.
- Attach the laser pointer or polar scope to the MSM and align the ballhead on your tripod so the pointer is in line with Polaris.
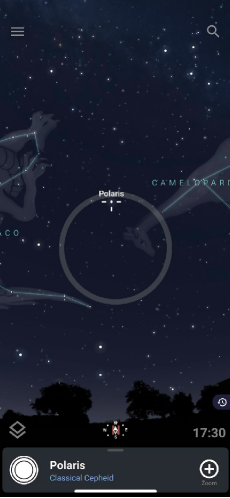
Screenshot of Stellarium helping you locate Polaris
in the sky.
- Adjust the ballhead on the MSM for your composition. As the MSM rotates over time you will have to adjust your camera level.
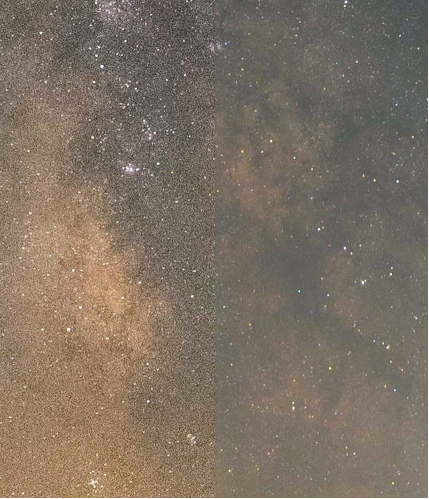
On the left a single exposure.
On the right a tracked expo- sure showing the difference in noise
That's how easy it is to use a Move Shoot Move Star Tracker! Now your ISO can be dropped from 3200 to 800 or even lower. This is why we simply love this tracker. The ease of use, weight, portability and price compared to its competitors is unbeatable.
- To align your Move Shoot Move in either Hemisphere, you will need to use the laser pointer or polar scope to find Polaris (Northern Hemisphere) or Syrius (Southern Hemisphere). There are many apps you can use to find the appropriate star (Stellarium is show above). Once you find it adjust your MSM tracker and guide it to the star and get as close as possible to its center. You should be aligned and able to get sharp stars. If your stars are trailing check to make sure your alignment is still good. Anytime you touch your camera or tripod you may bump it out of alignment.
Step 6 FOCUSING ON THE STARS
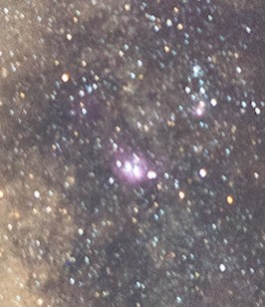
An image where focus was missed. The same section of the sky but with focus spot on
Despite the advancements in autofocus, modern cameras still can't reliably focus on the stars.
Learning how to manually focus your lens is the last step in capturing a beautiful image. Ideally, you would use the infinity mark (∞) on your lens or camera focus meter, but not only is this marking rarely accurate it can change depending on the temperature (or if your lens took a recent tumble).
To find focus, locate a bright star and put it near the center of your frame where your lens is the sharpest. If you are lucky your camera has a live view or is mirrorless and you can zoom in while manually focusing. First focus to infinity, then adjust your focus until the star changes from a big blob into a tiny dot. Once you are here you can try to fine tune your focus by slowly racking back and forth. The star will get larger as you get out of focus, both before and past infinity. To achieve the best focus you are trying to get the star as small as possible. Once you are satisfied with your focus don’t touch the lens. If you move your camera significantly or change your focal length go through this process again.
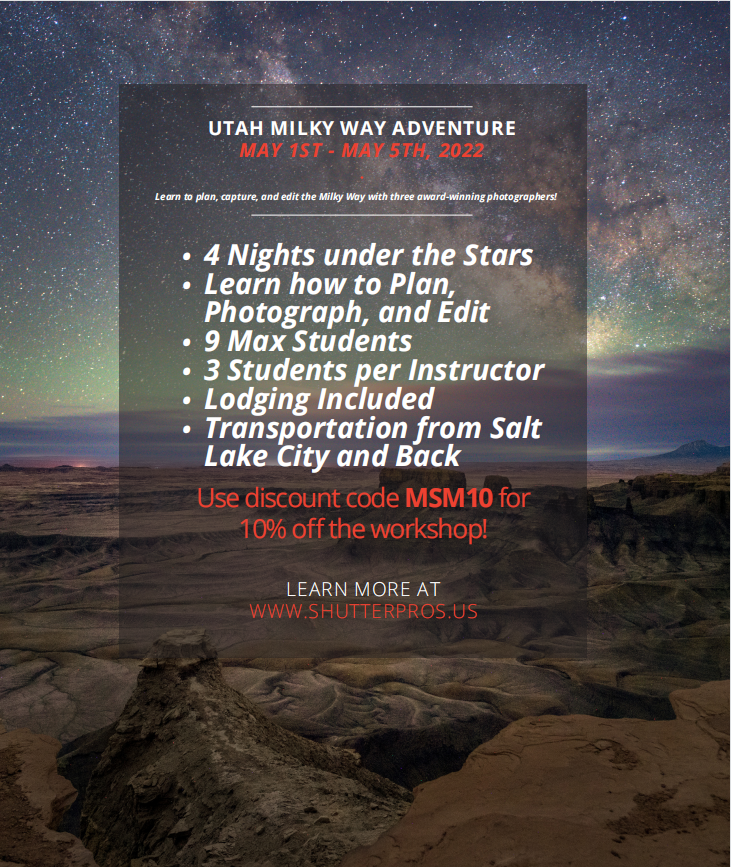
Want to know more about the Workshop in Utah, please check here: https://www.shutterpros.us/
About the Authors,
Arwin
Arwin is a full-time landscape/fine art photographer living in Las Vegas, Nevada. Her photography focuses on the Southwest and Western USA under dramatic skies and the Milky Way. Her photography makes use of near-far compositions, focus-stacking, and exposure blending. She has spent countless hours exploring and photographing Utah and the Southwest. Arwin sells prints, NFTs, and runs workshops in Death Valley and the Eastern Sierra. Photographing and teaching others is her true passion.
See more of Arwin’s work below and be sure to follow her on Instagram:

Andy Leclerc
Andy Leclerc is a photographer based in Connecticut, USA. He is well known for his editing skills and creative ideas. He believes passionately in developing new techniques and working with other creatives which he taglines, "community over competition". His photographs have been featured/published in FORBES, DRONEAWARDS 2019, Sky Pixel, DJI Photographic Society, Drone User Magazine, and Masters of Drone Photography.
See more of Andy’s work below and be sure to follow him on Instagram:
Jamie Malcolm-Brown
Jamie is a published landscape/fine art photographer living in Shutesbury, Massachusetts. His award-winning art can be found on the cover of Appalachia and in the pages of the New York Times. In addition to being a photography teacher, Jamie works at a non-profit as a Communications Manager.
With landscape photography being Jamie’s passion, he spends the majority of his free time exploring New England in search of hidden gems and dark skies. Jamie loves to share his passion for aerial photography, nightscapes, and time-lapses with others.
See more of Jamie’s work below and be sure to follow him on Instagram:


