


MSM Polar Alignment Southern Hemisphere
Polar Alignment – Southern Hemisphere
Why do a ‘Polar Alignment’?
Before answering this question, let’s consider the purpose of a tracker. Basically, a tracker is a machine that is designed to rotate a shaft at the same speed as the earth’s rotation. If the shaft can rotate in either direction, the tracker can be used in both the northern and southern hemispheres. When a tracker is correctly aligned (by a process called ‘polar alignment’), its shaft will rotate any camera or telescope attached to it in the same direction and at the same rate as stars and planets ‘move’ due to the earth’s rotation. Thus a camera fitted to the tracker will be able to take long-exposure photographs without star trails. Note: MSM has added smart technology to this ‘rotating shaft’ concept that allows the MSM tracker to be used for variable-speed panning time-lapse photographs and videos.
Thus, the purpose of a polar alignment is to ensure the shaft of the tracker is parallel to the earth’s axis of rotation. This involves ‘pointing’ the axis of the shaft towards the relevant celestial pole.
How is a Polar Alignment done?
Basically, how do you ‘point’ the axle of the tracker towards the celestial pole (the point in the sky about which all heavenly bodies appear to rotate)? In theory, a person at the equator can ‘see’ both the southern and northern celestial poles but they will be on the horizon and easily obstructed by terrestrial objects (trees, buildings, hills, etc). At either the North or South Poles, the celestial pole is directly overhead. Anywhere in between the equator and the North/South Poles, the celestial pole is at an angle above the horizon equal to the latitude of the observer – close to the horizon for those close to the equator and moving more overhead with increasing angles of latitude.
Astronomers have identified stars close to the celestial poles that serve as a reference for polar alignment – in the northern hemisphere this star is ‘Polaris’ and in the southern hemisphere, this star is Sigma Octantis (σ Octantis). Polar alignment in the northern hemisphere is easier because Polaris is both brighter (easier to see) and closer to the celestial pole – see Table 1 to compare the two hemispheres.
|
Table 1 |
Northern Hemisphere |
Southern Hemisphere |
|
Closest star to Celestial Pole |
Polaris |
Sigma Octantis |
|
Proximity to Celestial Pole |
0.74 degrees |
1.05 degrees (1.5 times further from pole) |
|
Magnitude |
1.98 |
5.47 (25 times dimmer) |
As this guide is intended for polar alignment in the Southern Hemisphere, the focus will now be on locating and aligning to Sigma Octantis.
Where to look for Sigma Octantis
Locating Sigma Octantis is a challenge because
- it is dim (on the limit of visibility for naked-eye viewing - even in the best viewing conditions!), and
- it is in an area of reasonably non-descript sky.
It is recommended that you ‘practice’ finding Sigma Octantis before attempting a shoot so that you are confident of where to look and you know what you are looking for – after all, not being able to do a polar alignment is a ‘show stopper’. You can practice by using electronic aids such as apps on your smartphone.
The example below is based on the use of screenshots taken from the app ‘Stellarium Mobile Plus’
.

Start by using the app’s search feature to ‘search’ for Sigma Octantis. Once you have found it, you can use 2 fingers to zoom in and out. As you zoom out, you will notice dimmer stars will fade until only the brightest stars are visible. In the screenshot below, the red arrow shows Sigma Octantis, directly above the ‘South’ marker. You can zoom out so that the stars on display replicate the night sky as you see it in your area.

Now zoom in to where you think Sigma Octantis is. If you correctly identified the star, you will see the Greek letter ‘sigma’, σ, appear, then as you zoom in even further, the label ‘Sigma Octantis’ will appear (as in the screen shots below). If you got something else, just zoom out and start again at another location!

By the time the sigma letter (or the name label) is displayed, more stars will be displayed than will be visible through your polar scope – but this will be confirmation you have correctly identified where to look for Sigma Octantis!
Polar alignment using Sigma Octantis
For most of us, seeing Sigma Octantis with the naked eye will not be possible, so use of the polar scope (remember it’s image will be ‘upside down’) or some other optical aid will be necessary.
For example, can you figure out where Sigma Octantis is or should be in the south-looking night shot below?

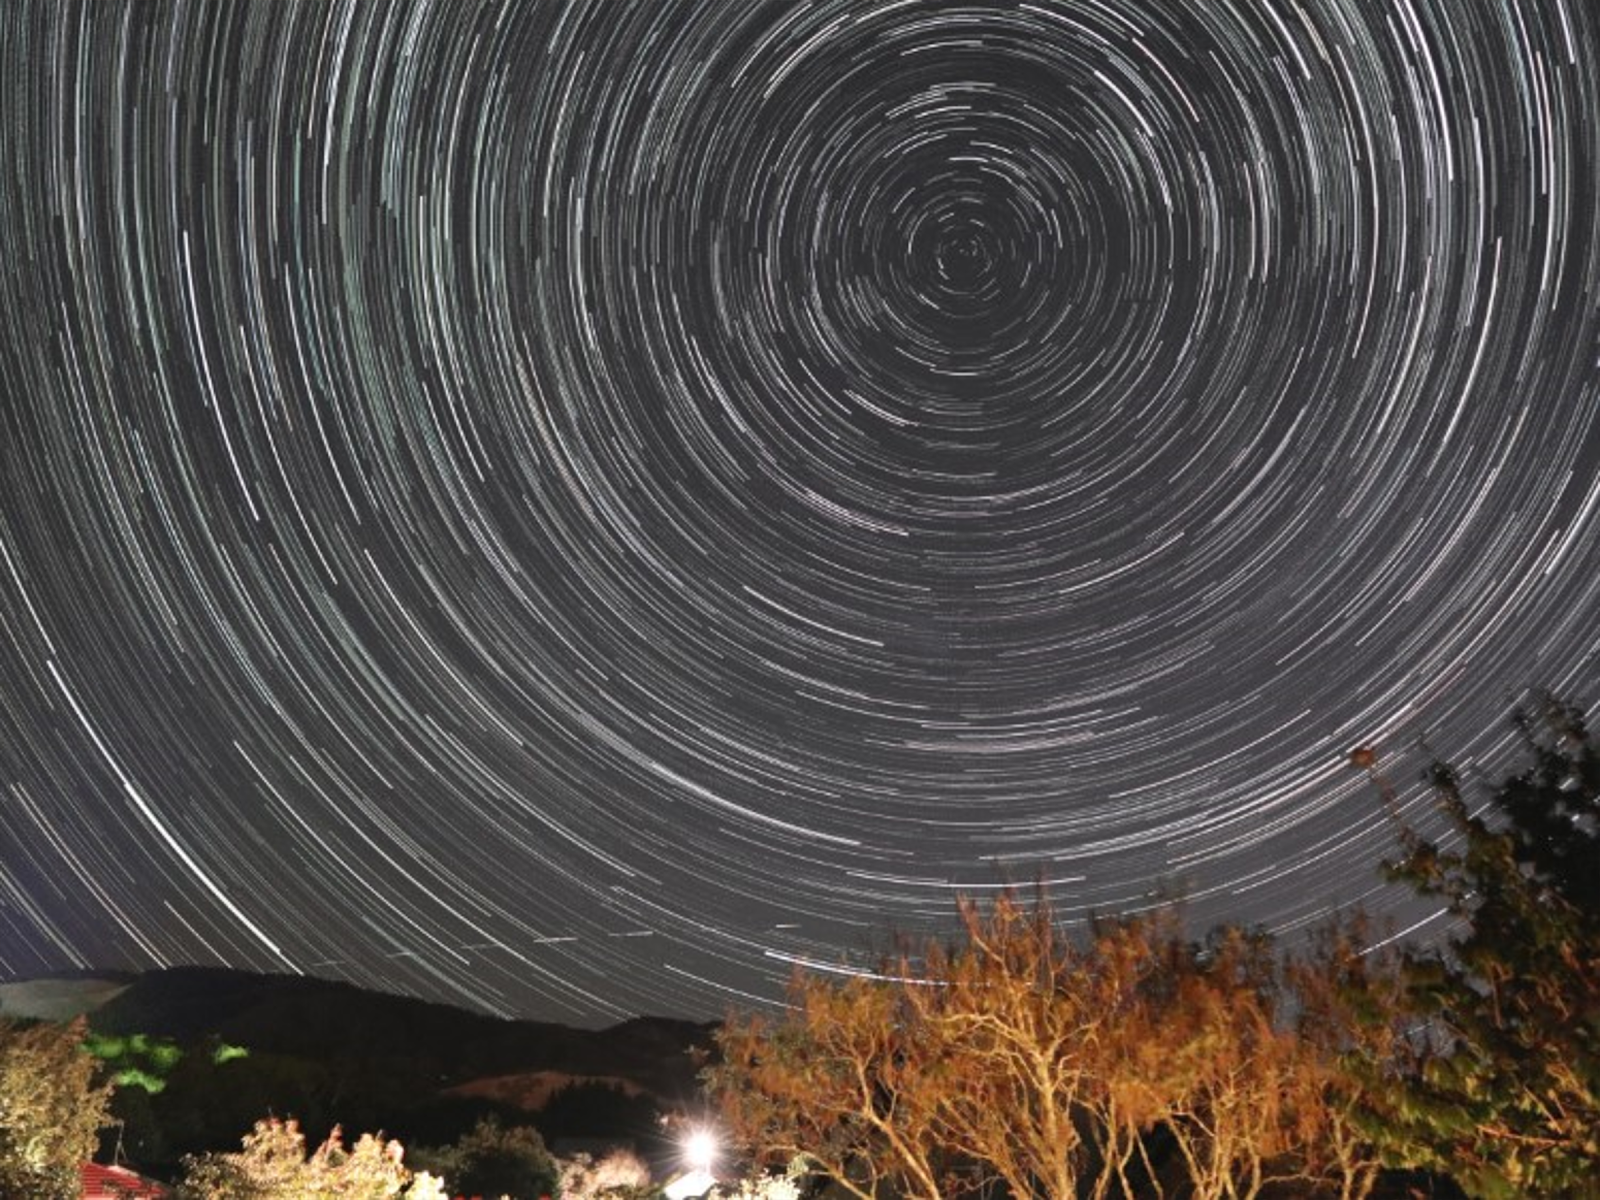
Here is a suggestion to help you gain familiarity of the ‘real world’ Southern Hemisphere night skies as viewed in your area. Using just a tripod (don’t use your tracker for this!), take a very long exposure photo (or take multiple photos over a long period and ‘stack’ them with software such as ‘StarStax’) to generate star trails. These star trails appear as a series of arcs forming part of concentric circles, and the southern celestial pole is at their centre! The image below (made using stacked multiple images) is an example of what you should be aiming to produce.
A tip for future reference – position your camera so that there is some feature in the ‘foreground’ (such as a power pole, rocky outcrop or mountain peak). Once you have established the location of the South Celestial Pole, you can use this feature as a reference for quickly locating the southern celestial pole. In the image below, the southern celestial pole will be directly above the highest part of the tree in the foreground or slightly to the right of the distant street light.

To help in the polar alignment process, we’ll now mark the centre of these concentric circles (and thus the South Celestial Pole) using the iOptron reticle – the reticle supplied with the MSM polar scope. The iOptron reticle consists of two sets of rings – the outer rings (for use by observers in the Southern Hemisphere) are marked 60’ to 70’ and an inner set of rings are marked 36’ to 44’ (for Northern Hemisphere users). These rings show the angular displacement from the centre of the reticle. Thus, the relevant reference stars (refer to Table 1 above) will appear are in the appropriate set of rings when the celestial pole is in the centre of the reticle. If Sigma Octantis is located between the 60’ and the 65’ rings and is in the correct orientation (more on that later), the South Celestial Pole will be in the centre of the reticle.
In the photographs below, the centre of the iOptron reticle is superimposed over the centre of the concentric rings – through the clever use of photo-editing software that allows the reticle to be scaled to replicate the view as seen through the polar scope.

The layering feature of the photo-editing software also allows the image with star trails (a composite made from stacking multiple individual photos) to be turned ‘off’ to view the reticle over an individual photo (without star trails) used in the stacking process (see below).
You will notice a bright star located between the 60’ and the 65’ rings at an angle between the 8 and 9 o'clock positions (arrowed) – this is Sigma Octantis.
NB – it is interesting to note there are other stars closer to the southern celestial pole than Sigma Octantis, but these are probably not used as a reference as they are much dimmer and harder to see.

At https://www.constellation-guide.com/constellation-list/octans-constellation/, Sigma Octantis is shown as part of a 4-star group in a trapezium-shape in the constellation of Octans (the blue arrow points to the 4 stars, connected by red lines). Sigma Octantis is the closest of these 4 stars to the South Celestial Pole. This shape rotates around the South Celestial Pole, varying by both hours of day and day of the year.

You can use various apps (such as Polar Finder) to find the orientation of this trapezium shape at the time and date you carry out your polar alignment, and you need to know this as you need to place Sigma Octantis at the correct position in the outer ring to get the southern celestial pole in the centre of the reticle.
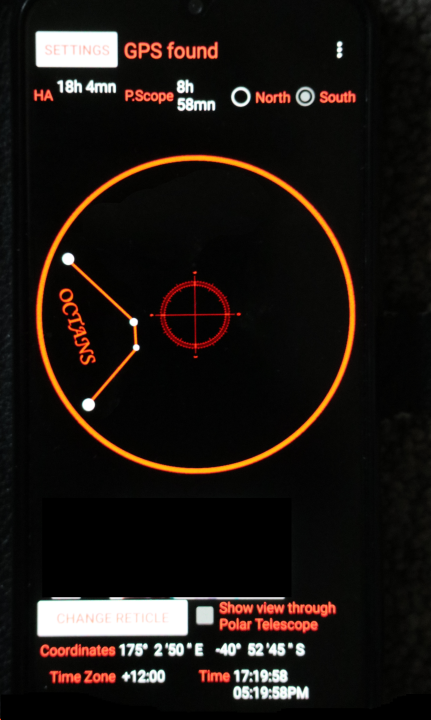
This is a screen shot from the free version of the ‘Polar Finder’ app. It shows the orientation of the trapezium shape as at the date and time of viewing. A tick box allows the app to display the trapezium’s orientation as viewed through a polar scope or by the naked eye or binoculars (see arrow). In this case, the display shows the view as seen by the naked eye or binoculars (box has been de-selected).
The trapezium lies to the left of the southern celestial pole, so we should try to get Sigma Octantis in the outer ring with the trapezium shape in a ‘>’ shape, as shown by the ‘Polar Finder’ app.
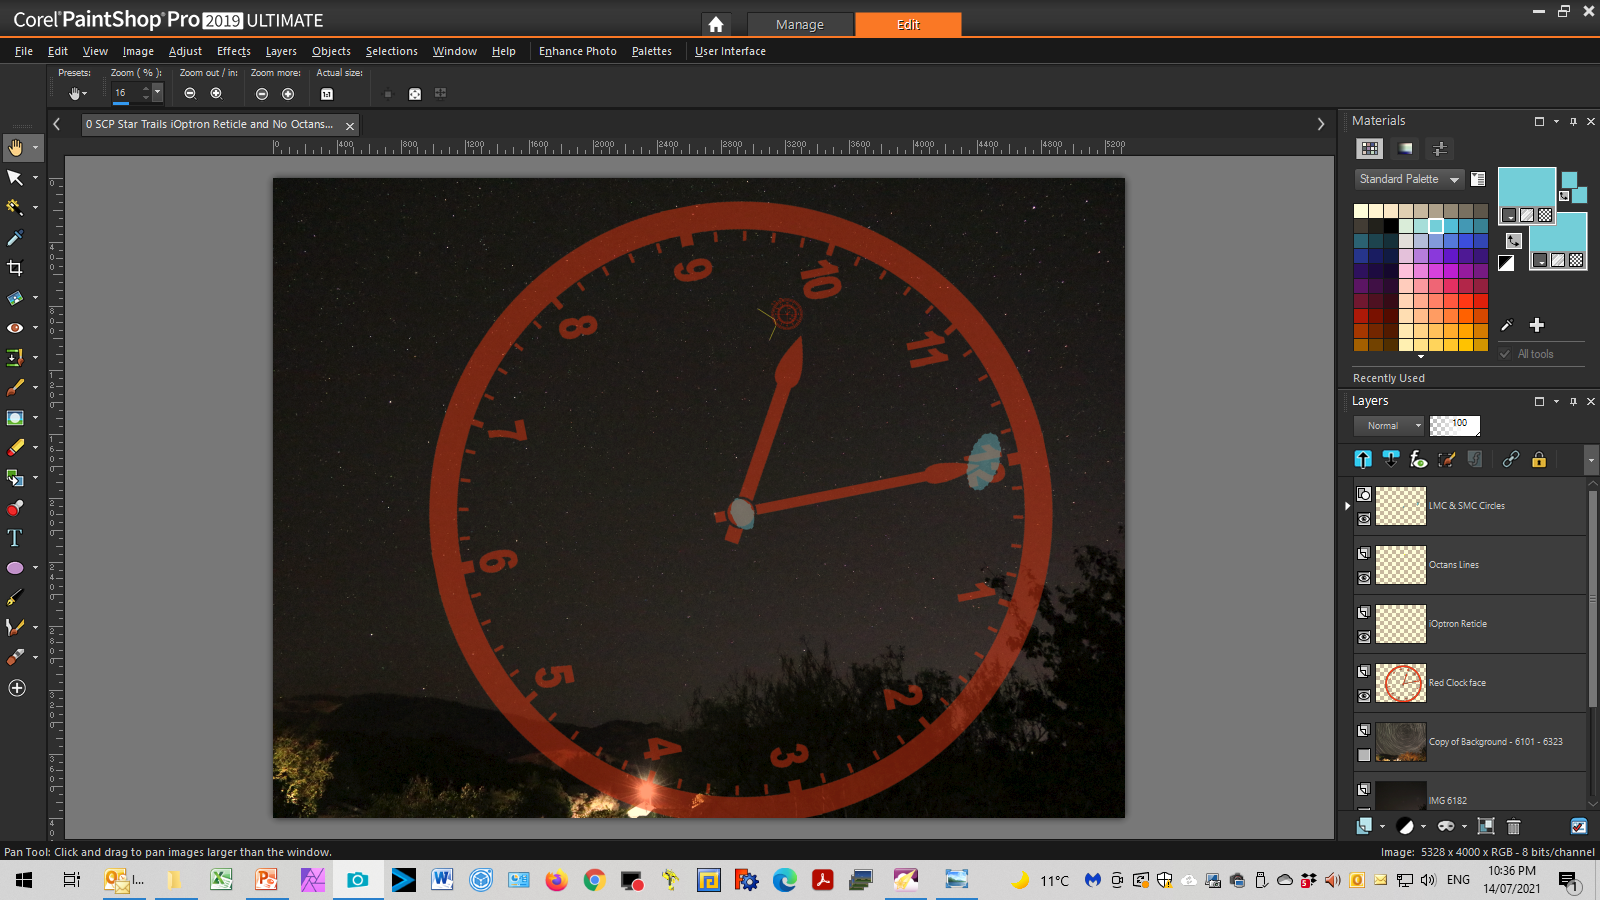
The trapezium shape is marked up on the reticle by yellow lines (below).

Reinforcing the point, with the trapezium shape correctly orientated and Sigma Octantis placed within the outer rings of the reticle (blue arrow, image below), the South Celestial Pole now lies at the centre of reticle.

By superimposing the reticle with the trapezium shape back into our original south-looking night sky photograph, you can see the position of the southern celestial pole (below).

This helps identify where to find Sigma Octantis (and the South Celestial Pole). However, when routinely carrying out a polar alignment you will want to quickly (and reliably) find this trapezium shape.
An indication of Sigma Octantis’ location can also be ascertained from the positions of the Small and Large Magellanic Clouds – below.

Sigma Octantis lies at about the 10 o'clock position when placing a clock face with noon positioned along the line connecting the two Magellanic Clouds (so long as they are visible – not always the case, especially when haze and/or light pollution may render them invisible).
Use of different reference star
If your equipment allows you to accurately set your polar scope to a specific azimuth and vertical angle, and if the app you use has the ability to give details of a star’s position at a specific time, you may be able to use this method to assist in locating the southern celestial pole. The details below are based on the use of the ‘Stellarium’ app referred to above (see page ).
Firstly, decide which star you want to use as a reference – for example, you may wish to select Alpha Centauri (one of the Pointers), because its brightness makes it easy to locate and it is visible all through the night.
By tapping on the time displayed at the bottom right of the screen of ‘Stellarium’, you can set the time and date for the display – see screen image below.

Set the time (and date) for when the star is to be viewed. In this case, we expect the observation to be made at 9 pm, so the time on the app was set to 2100 hours for today’s date (that is, 11 August 2021).

Using the app, ensure that Alpha Centauri is selected, then ‘pull up’ the tab for the star (red arrow in the photo below) to see both the azimuth and declination of the star for 2100 hours.

Set up your azimuth and declination angles to match those given by ‘Stellarium’ (green arrow above) and (at 2100 hours) point the polar scope to Alpha Centauri. Lock off the azimuth base and rotate your scope to point to an azimuth of 180 degrees (ie due South). You can use the app’s data to find the vertical angle setting for Sigma Octantis and thus complete the polar alignment process.
Other Methods for finding Sigma Octantis
Various methods and tools have been devised to locate Sigma Octantis, but the ‘best method’ is one that is reliable (repeatable), works for you in your conditions (be it cold, windy, with limited battery capacity, no GPS or cellphone coverage) and is accurate (ie., sufficient to meet your needs). Apps, laser pointers, and star charts are all great aids but no matter what, there is no substitute for having a good knowledge of the star groups around the South Celestial Pole - when you are out there on a hilltop in the cold and dark, no little labels pop up to identify each star or star group!!
Other ways of locating Sigma Octantis are:
- “How to polar align (“Apus” method)” at http://www.stellaraustralis.com/how-to-polar-align-apus-method/.
- See https://earthsky.org/favorite-star-patterns/how-to-use-southern-cross-to-find-south-celestial-pole/ - if you use this to find due south, you can set up your polar scope pointing south and then use the vertical adjustment of the wedge to locate Sigma Octantis and the South Celestial Pole.
Polar Alignment Using a Mobile Phone
MSM offer an optional cell phone holder to enable a mobile phone app to be used for polar alignment. The process for polar alignment using this technique is well documented elsewhere so no further detailed discussion is required here. However, there are a couple of points worth noting.
Firstly, this method can be used for polar alignment in daylight (as it does not rely on sighting Sigma Octantis).
Secondly, if you are planning to do polar alignment using both the mobile phone AND the polar scope, you will find there is inadequate room on the rotator to fit both the cell-phone holder and the polar scope.

Thus, you will have to use one device then unclamp it to fit the other. It is probably best to use the cell phone method first to give an initial alignment and then fit the polar scope for a more accurate alignment.
Equipment Set Up
This section describes one user’s set up using the Australia Pro-Kit for Southern Hemisphere users. This kit consists of the Rotator, Phone Mount, Polar Scope (Type A), Scope illuminator, Scope Bracket, Wedge, and hardware fittings (screws and adapters). Subsequently, the new right-angle eyepiece became available and was purchased along with extra plastic screws and adapters.
Polar Scope and Mounting
The Type A Polar Scope has an iOptron reticle – see image below – which has been described in the polar alignment guide above. Note – the 2 images below are taken from the MSM website and the light is upgraded the cableless one.

Before attempting a polar alignment, it is recommended you ensure your polar scope is focussed and its registration is satisfactory (scope registration is set by the factory but it is worth checking before use).
Mounting
The mounting block has a larger opening on one side than the other (with 3 different diameters). The tip of the objective lens polar scope only can be inserted into the larger hole, and is held by a single plastic screw. This leverage resulting from the scope’s centre-of-gravity being a long way from the support, makes it prone to vibration and movement. The right-angle eye-piece exacerbates the problem.
Focusing
Focus the polar scope by adjusting the objective lens (see image below) so that distant objects - especially stars - are in sharp focus. You can check the focus during daylight by (1) unlocking the objective lens, (2) selecting a distant object, and adjusting the focus ring. Don't worry if you have to turn the focus ring several turns – so long as the focus is achieved! Once focused, lock the objective lens to prevent accidental movement. It is worth repeating the process at night to ensure stars are in focus, but once focussed and locked, under normal use there should be no need to repeat the process.
Focus the reticle by adjusting the eyepiece focus. Unfortunately, this cannot be locked off, so you may need to check this each time you use the scope – worth doing before you go out to start your shoot!

Registration
The purpose of registration is to ensure the polar scope actually points to an object in the centre of the reticle. This can be done in daylight by fitting the scope in its mount, using the level on top of the scope to level it while pointing it to a distant object. Centre the reticle on some feature in the distance then without moving the mounting block or its supporting structure, gently unscrew the plastic screw holding the scope in its mount until you can rotate the scope 180 degrees so that the level is now level but on the underside of the scope. If the scope is properly registered, the distant feature will be in the centre of the retile. You can adjust the reticle so that it is centred, but this is a non-trivial task and probably not worth doing if there is only a small error in registration. Guidance on how to correct registration is given elsewhere.
Aligning Rotator and Polar Scope Axes

No adjustment exists for correcting any variation between the axis of the rotator and the axis of the polar scope. The photograph (opposite) shows the polar scope mounted on the rotator, with the red line showing the axis of the rotator and the blue line showing the centre line of the polar scope. These must be parallel - if they are not parallel, the rotator axis will not be correctly aligned when the polar scope is pointing at the southern celestial pole, and there will be an error in the polar alignment. This alignment also applies in the orthogonal plane - or when viewed from 'side on'.
In the photograph, you can see that the red and blue lines are slightly divergent. In this case, additional plastic screws were purchased so that the polar scope mounting block is secured to the rotator chassis by two screws (not just the one in the kit supplied with the polar scope). Some adjustments may be possible by tightening one of these screws more than the other, but you should be aware of this as a potential error in your polar alignment. If it is significant, contact MSM.
The hole in the polar scope mounting block has 3 diameters (see image on page ) and the polar scope only fits the largest diameter of the hole. Therefore, the scope can only be held by its tip and as only a single plastic screw (Screw A in the photograph above) is supplied, it’s fitting is not very secure. The leverage applied (even when using the eye-piece carefully) can cause too much movement in the scope’s pointing direction and may contribute to an error in its alignment with the rotator’s axis. This movement could be reduced if the hole in the polar scope’s mounting block was machined the full length of the block, it would better support the scope and make it more secure for accurate alignment.
Setting Up – One way using Australia Pro Kit
This part of the guide summarises one way to set up the tracker. It uses a tripod, the Australia Pro Kit, and MSM’s new right-angle eye-piece.
-
Because the MSM ball-head allows for azimuth-only adjustment, it was fitted directly to the top of the tripod by removing the ball-head (which is used later to support the camera).

Tripod with its ball-head removed. (Note: this is not an endorsement of any specific brand of tripod, nor has the author been given any reward or payment by the manufacturer of the product).
2. Fit MSM’s ‘wedge’. The wedge allows you to make fine adjustments both vertically and horizontally.

3. Fit the MSM rotator, securing it via the mounting hole on the side of the rotator’s casing. In the images below, the tripod’s ball-head has already been fitted to the rotator (the camera will be fitted to the blue clamp later).

4. Fit the mount for the polar scope using plastic screws.


Tips when preparing for your shoot
- If you know precisely where south is, you can set up your rig with the polar scope pointing south and lock off the azimuth adjustment so that you only need to use the wedge‘s vertical fine adjustment to raise/lower the scope until you find Sigma Octantis.
- Before starting your polar alignment, (i) ensure you have made all the required settings for your camera and intervalometer then turn the rotator on (you may opt to not do this if you are concerned that you may run out of battery power before you complete shooting). There is a risk of bumping your device and accidentally knocking it out of polar alignment if you leave setting up your camera until after polar alignment.
About the Author

Jeff Wastney is a Professional Engineer in radiocommunications by training but has been retired for some years now. He lives on the Kapiti Coast on the south west coast of New Zealand's North Island. While his interests in photography are wide ranging, he has a special interest in low light (long exposure) and time-lapse photography. He became involved in astrophotography during the initial covid lockdowns. He also enjoys photo-restoration and has restored a number of old family photographs that have been damaged through handling over the decades - some of them almost 150 years old. His non-photography interests include flying radio-control model aircraft and singing.
This is the contact email of Jeff: photojeffwastney@gmail.com, he is a very open-minded person and welcomes the feedback of this article or anyone who wants to contact him for discussion~


Laissez un commentaire