


Everything You Need to Know about Astrophotography - 2100 words, 8 mins
Looking for a method simple enough to kickstart your astrophotography journey?
The following are some of the top questions people ask when starting out on their astrophotography journey:
Is there a way to do astrophotography easily?
How can I shoot the Milky Way with less noise?
What is the easiest way to take amazing Milky Way photos?
How can I do a long exposure on the Milky Way?
Do I need professional equipment for astrophotography?
This guide is designed to help anyone take amazing Milky Way photos easily!
The Misunderstandings
Many people looking to take up astrophotography have the misinformed view that only professionals can take amazing photos of the galaxy and night sky. This is wrong.
Most of the time, we see the large equipment associated with astronomy and think it is required for astrophotography. However, these telescopes are not necessary for astrophotography. To get an amazing Milky Way photo? Big equipment is absolutely not needed.
If you have a digital camera, you're almost ready for astrophotography.
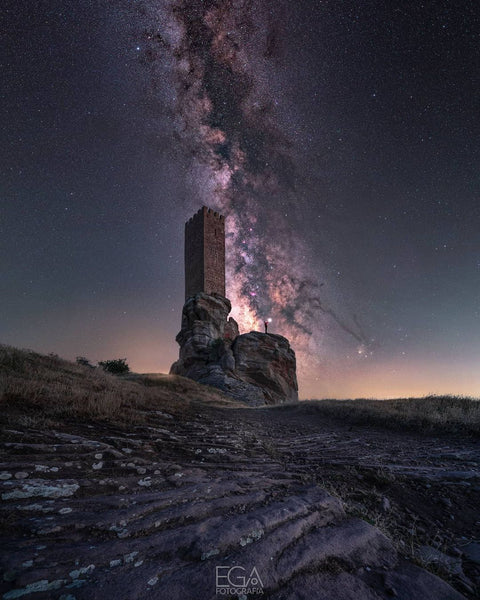
If you want to take amazing photos like this one, then you need to master astrophotography!
For astrophotography, there are two branches you will want to focus on: Untracked astrophotography and tracked astrophotography.
Untracked Astrophotography - 500/NPF Rule
- Limited Exposure Time Following the NPF/500 Rule
Since the Earth is rotating on its axis, its motion under the stars gives the appearance that the stars are moving across the sky. The stars – like the sun during the daytime – move from east to west across the sky every night. Each and every star moves 15 degrees westward in one hour.
Due to the Earth's rotation, we can only expose several seconds before we get noticeable star trails. The maximum exposure time mainly depends on our camera's focal length. The longer the focal length, the shorter the maximum exposure time before getting star trails.
- Maximizing the ISO
To avoid star trails, we have to prevent image underexposure by maximizing the ISO settings.
- The Faster the Lens, the Better
Having a fast lens with a wide aperture will leave more space for exposure time, and we can thus lower our ISO to have less noise.
- Stacking to Achieve Long Exposure
Suppose we have an 85mm lens, our maximum exposure time will be around 5s. Usually, this is not enough time to capture the light needed for astrophotography. In order to gain enough exposure time, we must combine many of those short exposure images into a single image. The process of combining these single images is called stacking.
Usually, there are three different types of images required for the stacking process: Light frames, Dark frames, and Flat frames. Just be wary of noise reduction in post-production . . . stars are true point light sources, and noise reduction algorithms can eliminate stars along with noise if you are not careful.
Tracked Astrophotography
In order to take long exposures, we need to counteract the Earth’s rotation to prevent star trails, and that’s where a star tracker comes in.
As we know, the Earth rotates on its axis. It takes 23 hours, 56 minutes, and 4 seconds for the Earth to make a full 360° rotation. An astrophotography star tracker (or just a star tracker or astrophotography mount) is a device that counters the Earth's rotation. The tracker revolves around its own axis once every 24 hours, but in the opposite direction of the Earth to counteract the Earth’s self-rotation.
By doing this, it will follow the star’s movement in the night sky, then the stars will be (synced) tracked, and they will be relatively still with our camera lens, allowing you to extend your shutter speed while capturing sharp stars.
The biggest advantage a tracking camera mount has over a stationary tripod is the ability to shoot exposures well past thirty seconds. When the star tracker has been properly polar-aligned, images of 120-seconds or more in length are possible (depending on your focal length).
Why Star Tracker
Below are the main benefits of using star tracker for your astrophotography:
- Increase The Exposure Time
This is the key factor when using a star tracker for astrophotography. You can decrease the shutter speed and get exposures of several minutes depending on the focal length you use. This will also reduce the digital noise in your images. Finally, thanks to increasing the shutter speed, you’ll have more flexibility to adjust the rest of the settings.
- Reduce The ISO
As a direct result of increasing your shutter speed, you can reduce the ISO. Instead of using the typical night photography ISO 3200-6400, you can drastically reduce the ISO to values below 1600 in tracked astrophotography. This will reduce the noise and provide you with a more dynamic range in your images.
- Close The Aperture
Closing the aperture will result in sharper images. Also, you’ll see a big improvement with less vignetting and lens aberrations like coma or chromatic aberrations.
When these three factors are brought together, they will give you a higher quality image, with a ton of detail, less noise, and more color. As mentioned earlier, acquiring a star tracker for astrophotography will increase the quality of your astrophotography exponentially.
- Post Processing
Well yes, with a tracker, there will be the side effect of a blurry foreground because of the movement of the star tracker. In this case, we just need to take a new photo by turning off the tracker and merging these two images with Photoshop later.
Let's recap:
One shot with the tracker off, to get clear foreground but blurry stars, then turn the tracker on to get clear stars but blurry foreground. Finally, merge these two photos in Photoshop to get the final, amazing Milky Way photo.
How to Set Up Your Tracker (Move Shoot Move)
The Move Shoot Move Tracker can be configured a few different ways, but here is the most popular one.
- Attach an Arca-Swiss plate to the bottom of the tracker. The ¼ screw on any Arca-Swiss plate should screw in perfectly.
- Attach the tracker to the ball head.
- However, we need a second ball head to attach the camera to the tracker. You don’t want a big and bulky ball head here, as it will only cause problems. You’re much better off with a small, lightweight ball head.
- As shown below.

How to Polar Alignment
To make a tracking mount work, its rotation axis has to be aligned properly with the Earth's rotation axis. Therefore, its rotation axis must be pointing towards Polaris, commonly referred to as the North Star (Earth's rotation axis goes through the North Star). If this is the case, the rotation of the tracking mount will cancel out the Earth's rotation and longer exposure times are possible. The alignment of the tracking mount is crucial for tracking accuracy.
This process of alignment is commonly referred to as polar alignment. While this does sound complicated, a laser pointer makes the process super simple.
Move Shoot Move has made this process even simpler. Just turn on the included laser pointer and point the laser at the North Star, Polaris.
The process of polar alignment can seem daunting at first, but once you have the process nailed down, it will only take a few seconds to achieve.
A question I’m often asked after polar aligning is how do you move the equipment? Well, you can move the camera wherever you want, but it’s important to remember that you are polar aligning the star tracker, not the camera. So, the mount itself will stay exactly where it is, but the camera will move. If using a ball head, then simply move the ball head.
Camera Settings
So now we’re fully set up and polar aligned, it’s time to start imaging. The settings will be the ones you’re familiar with from your untracked images. However, we now want to adjust the shutter speed to something much longer. As a reminder, here are the settings previously used:
- Aperture - If using a lens, you want the aperture to be as wide as possible, so try setting it to something like f 2.8.
- ISO - If using a DSLR, then I recommend trying ISO800 or ISO1600 for deep sky astrophotography.
- Shutter speed – Let it go as long as you can go without getting star trails. This will depend on how accurate your polar alignment is, but try 30s exposures to start.
How to Focus
If you’re not confident with your polar alignment then I recommend starting low. Once you nail down your polar alignment, there’s no reason why you can’t do 2 minute exposures or even longer. To achieve anything longer than a 30 second exposure, you’ll want to set your shutter speed to bulb, and then connect a remote shutter release cable, which will allow you to control your camera's exposure time. Make sure you buy the right type for your camera.
At this point, we’ll need to focus on a bright star to ensure the stars are sharp. To do this, use the live view on your camera and zoom in as much as possible and adjust the focus until the star is as large as possible. You can buy cheap focus aids called a Bahtinov Mask to help with focus. A Bahtinov Mask is a tool astrophotographers use that goes over the lens or telescope objective and creates diffraction spikes. Once the spikes create an X with a line through the middle of it, you have achieved perfect focus.
Now, we’re into our imaging. Again, make sure that you’re checking your first image to look for star trails. If you observe any of these issues, you can go ahead and change ISO, etc. Your settings may need to be adjusted after your first test shot. Keep taking test shots until you find the right settings for your setup.
You’re going to start seeing a real difference in your images now. There will be a lot more stars showing up. If you’re imaging a deep sky object, you will now be capturing those faint details, and this is where post-processing gets really fun. Remember, we need to take calibration frames to remove noise from your final stacked image.
CONCLUSION
Using a star tracker for astrophotography will set a before and after in your night photos. Once you are familiar with the basics, it is the item that will make the biggest difference in your images.
If you are wondering if you need the Move Shoot Move star tracker for astrophotography, then look at your recent night images. If you are missing detail, color, and texture, then the answer is a resounding YES!
Reviews
"This device opened new horizons in my night sky photography. It’s easy to set up and simple to use. The results are amazing! Highly recommended!" - Vlad K, US.
"MSM Rotator is a game changer. It supports all my cameras, super simple for polar alignment. What's important? The annoying star trails disapper, and I can expose more than 60 seconds!" -Mission Viejo, US
"This is my second portable tracker, but by far my favourite. I love how it's so light and portable and take's minutes to set up. I bought both the polar scope and lazer, but the lazer is so good I've not had to use the scope yet. I've captured the winter milkyway with my 16mm lens, the stars were so tack sharp that they had mini starbursts. The detail I was able to achieve was mind blowing. I've also used my 18-55 and 55-200mm lenses to capture the Orion constellation and the Orion Nebula. I am so glad I bought this and look forward to using it for milkyway landscape shots and photographing other deep sky objects in the night sky in the near future. Highly recommend it. Thanks for reading." - Mark Coull, UK
"I love my MSM! It is small, lightweight and easy to use. I have used larger star trackers for many years, and this one is a game changer." - Beth Ruggiero York, US
"I've got from my friend a Star Adventure tracker. But I’ve never used it due to rather complicated settings. MSM is lighter, easier to use. So far I've used it once but plan to do it regularly." - Sylwester Zacheja, Poland
Warranty
1-YEAR WARRANTYWe provide a 1-year warranty for our tracker. You are under warranty from the moment you receive the product.
30-DAY RETURN POLICY
If you are not satisfied with your purchase, you may return your order to us for a refund.
Buy now to get 10% OFF for your first order!
CODE: "BOOK"
Only available at https://www.moveshootmove.com/discount/BOOK


Laissez un commentaire